Taxi, Run-up, Traffic Pattern
This section provides essential training notes for new student pilots on taxiing, performing run-up checks, and understanding airport traffic patterns.
Taxiing Basics:
- Understand that airplanes perform best in the air, but ground operations are essential.
- Your instructor may have you taxi during your first lesson.
- Coordinate use of throttle, control yoke, and foot pedals.
- Steering is done with feet using rudder pedals linked to the nose wheel.
- Braking is achieved by pressing the top of the rudder pedals.
- Steering and Braking Techniques:
- To turn right, push on the right pedal; to turn left, push on the left pedal.
- Use differential braking for sharper turns by applying the brake on the desired side.
- Avoid riding the brakes; keep heels on the floor and use toes for steering.
- Power Management:
- Advance the throttle slowly to start moving, then reduce power once underway.
- Use brakes only to turn or stop; do not control speed with high power and brakes simultaneously.
- Maintain taxi speed no faster than a brisk walk.
- Safety Precautions:
- Test brakes during the first few feet of taxiing to ensure proper function.
- In confined areas, taxi slowly enough that the airplane will stop if brakes fail and throttle is reduced.
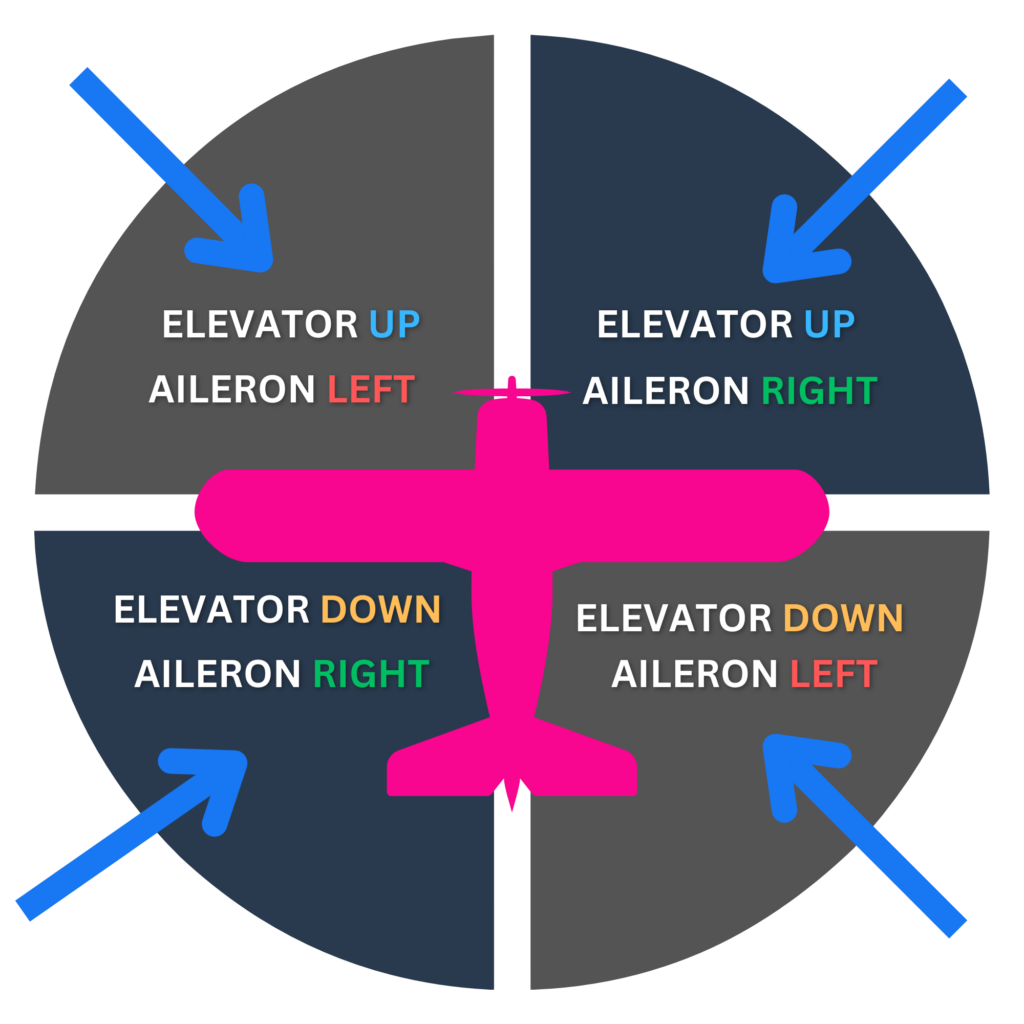
- Handling Wind During Taxi: Crosswind Taxi Techniques - Pilot Institute
- Strong winds can affect the airplane's balance; use proper control inputs.
- In a left quartering headwind: aileron left, elevator neutral.
- In a right quartering headwind: aileron right, elevator neutral.
- In a left quartering tailwind: aileron right, elevator down.
- In a right quartering tailwind: aileron left, elevator down.
- Remember: "Turn into a headwind, dive away from a tailwind."
- Practice these techniques even in light winds to build confidence.
- Strong winds can affect the airplane's balance; use proper control inputs.
Run-Up Checks:
- Positioning in the Run-Up Area:
- Park with adequate distance from other aircraft.
- Angle the airplane to direct propwash away from others.
- Performing the Run-Up Checklist:
- Set parking brake.
- Ensure seats are secure and belts are snug.
- Verify doors and windows are closed and locked.
- Check flight controls for freedom and correct response.
- Set altimeter and align heading indicator with the compass.
- Set elevator trim tab to takeoff position.
- Confirm fuel gauges reflect correct fuel amount.
- Set mixture to rich; ensure fuel selector is on BOTH and fuel shut-off is ON.
- Engine Checks:
- Increase throttle to 1800 RPM.
- Check magnetos by turning each off individually; RPM drop should not exceed 150 RPM, with no more than 50 RPM difference between them.
- Verify vacuum gauge is in the green range.
- Check oil pressure and temperature are within operating range.
- Test alternator by turning on landing light and observing ammeter deflection.
- Ensure no warning lights are illuminated on the annunciator panel.
- Return throttle to idle (800-1000 RPM) and adjust friction lock as needed.
- Prepare for Takeoff:
- Turn on strobe and landing lights.
- Set avionics and GPS as required.
- Set transponder code to 1200 (VFR).
- Set flaps as needed (usually up for normal takeoff).
Understanding Traffic Patterns:
- Components of a Standard Left-Hand Traffic Pattern:
- Departure Leg: Direction flown during takeoff.
- Crosswind Leg: Flown at 90 degrees to the runway after takeoff.
- Downwind Leg: Parallel to the runway in the opposite direction of landing.
- Base Leg: Flown at 90 degrees to the runway before final approach.
- Final Approach Leg: Aligned with the runway heading into the wind.
- Departing the Traffic Pattern:
- Climb straight ahead on the departure leg.
- Upon reaching pattern altitude, continue straight or turn 45 degrees in the pattern direction (left for standard patterns) to depart.
- Entering the Traffic Pattern:
- Commonly done by approaching at a 45-degree angle to the midpoint of the downwind leg.
- Continue onto the downwind, base, and final legs for landing.
- Follow specific airport procedures as required.
Runway Markings and Headings:
- Understanding Runway Numbers:
- Runway numbers correspond to their magnetic direction rounded to the nearest 10 degrees, dropping the last zero.
- Example: Runway 36 is approximately 360 degrees (north).
- Runway 18 is approximately 180 degrees (south).
- Reciprocal runways have numbers 180 degrees apart.
- Parallel runways are identified with letters:
- L for Left
- C for Center
- R for Right
- Runway numbers correspond to their magnetic direction rounded to the nearest 10 degrees, dropping the last zero.
- Compass Rose Directions:
- North: 360 degrees or 0 degrees
- Northeast: 45 degrees
- East: 90 degrees
- Southeast: 135 degrees
- South: 180 degrees
- Southwest: 225 degrees
- West: 270 degrees
- Northwest: 315 degrees
- Alignment Confirmation:
- Runway heading should agree with the airplane's magnetic heading within 5 degrees.
Remember, mastering ground operations, run-up procedures, and understanding traffic patterns are essential steps towards becoming a proficient pilot. Practice these techniques to build confidence and ensure safety in all your flights.